Tannen
 Town: AL CN; 15,000gp limit; Assets 9,000,000gp; Population 5,000; Mixed (90% human, 5% halfling, 2% dwarf, 3% other)
On the coast of the Jæruel, where the river meets the sea, lies Tannen (pronounced TAW-nen), a bustling seaport of a town built on sandy soil.
Architecture
The larger, more established buildings of Tannen are of sandstone and light wood from the forests harvested upriver near the village of Ches.
The buildings on the capitol grounds are of carved alabaster, taken from the mines east of Alabaster. The humbling, white edifice in the center of the city lies on a 5-acre plot surrounded by formal gardens decorated with flowers from the farthest reaches of the Jæruel. This is truly where the goods of the Jæruel comes together in an impressive display of what a successful merchant collective (some would say oppressive) can accomplish.
Layout
Along the banks of the river Ches runs a short wall of sandbags to keep the river in its banks in rainier months. Within five feet of these walls rise the older and more ornately-decorated buildings made of old hardwoods, including the town hall, the Jæruel central offices, the two inns that made Tannen famous (Inn of Golden Meadows and The Lark’s Nest), Smullivan’s Emporium, and, where the river meets the sea, the shipyard, where ninety percent of the seaworthy vessels in the Jæruel are built.
The town blocks off the river are devoted to residences, including the mayor’s house and on a low hill the wealthy neighborhood inhabited entirely by those in executive positions within the Jæruel, retired merchants who now manage their personal matters from their estates.
The rest of the town is a hodge-podge of market squares, shops on lower levels, and residences rising in the second and third storeys.
Key locations:
* Capitol Grounds – large, new construction that towers over town hall
* Town Hall – a converted keep that predates the town
* Jæruel Central Offices – new constructions across the river
* Twin Lighthouses – one in north-town and one in south-town
* Smullivan’s Emporium – market for many items
* Inn of Golden Meadows – standard inn named for the surrounding countryside
* The Lark’s Nest – exotic inn, featuring delicasies and fine things
* the shipyard – busy, working-class district where the river actually meets the sea
This town has served as the center of government for the Jæruel since the central offices of the merchant collective moved here two generations ago.
Map
(to follow in later post)
Personas
The Jæruel hierarchy represents the most notable personas in town. Galway Froid (mayor), Fennel Chatwid (head consulate), and Zann Diacon (finance minister) are the highest-ranking officials in Tannen.
The innkeeper owner of the Lark’s Nest is a boistrous legend. Of foreign descent and well-traveled, he tells stories the way most men tell lies, with the upmost of ease. Chariz Muqatad is known throughout the Jæruel, and there are those who visit Tannen just to meet him and hear his stories. In the process, he listens to their stories, which he uses to continue to embellish his own tales.
J.P. Smullivan is a trader who has recently joined the Jæruel, electing to pay his membership dues rather than risk losing his business to the town guard. Though less-than-friendly to new faces, largely due to this pressure to join the Jæruel, he is aware of much that transpires in Tannen and thus represents a great source of knowledge. The key is getting him to share it.
Plot Points
Each of the executives in the wealthy district finance treasure hunting expeditions and each have constant need for couriers and escorts. In addition, the Meldor House is known for financing voyages inland, past Westfort into the mountains and plains beyond. Zane Meldor is a known eccentric, known for his misadventures in the brothels in Tannen’s slums. He is ailing, and has been convinced that the fungal cure for his illness lies west of Westfort.
Smullivan is always after new supplies, especially those of an exotic nature. He knows of certain individuals who possess such items, and runs a secret business trading such items. Interestingly, it seems he has thieves steal from one Jæruel or Tannen city official which he then sells to another, and so on. He is likely to hire a party with an experienced enough thief to acquire such items from the homes of the wealthy.
Chariz Muqatad needs a message delivered to his extended family back in the dry lands to the far south, across the Old Bay. He is willing to pay handsomely for the message’s delivery. The message itself is so important that it has been stuffed inside a chicken, and must be delivered while the chicken still lives. This is an age-old custom for communicating among his people.
 Galway Froid’s daughter, Ammrie has gone missing. Rumor has it she is being held for ransom, but there is no official word on this. If the party inquires too directly in official circles, they are likely to be taken to the dungeons beneath the town hall, a converted keep that predates the rest of the city, for probing and questioning. Others who have relevant information include Chariz Muqatad, who said he overheard some of the kids joking about staging an abduction, and Smullivan, who sold a load of face paint and robes to some of the local teens. The real story is that Ammrie had her allowance cut back and so she and her friends decided to stage a kidnapping to collect the ransom. It turns out, however, that when a local thug heard of this, he took her from her friends, and now holds her in a cliffside camp overlooking the sea to the north of Tannen, where he awaits delivery of the ransom sum.
Once the teens are found, they will admit their part in the staging, and provide a description of the thug, who happens to be Thaddius Brewster, former employee of Smullivan’s. He used to lift large crates by himself and earned various nicknames for his feats of strength. If asked, Smullivan will mention Brewster’s departure from his shop lines up with the time of the supposed kidnapping. Once returned, the mayor will pay the party handsomely, though less than the original ransom. He is a shrewd merchant, after all!
The dungeons beneath the keep lead in various directions throughout the city. They are well-explored in the vicinity of the town jail; however, the secret, windy passages are said to hold more in store for an adventurous enough lot.
Posted in Encounter and tagged farghoal, Jæruel, Location, town by Stephen Hilderbrand with 1 comment.
Random Encounters
Random encounters have gotten a bad name in recent years, and mainly that’s because they have not evolved past a simple chart of monsters to be fought. Presented below is a chart of random encounters that I came up with for my next homebrew campaign. Not intended to be the meat of any session, they are more like a quick spice I can throw in when the characters travel from place to place.
The categories and encounters in this list create flavor more than anything: they each allow me to present details that build the themes I want to emphasize in my game. For example, the lands where the game takes place in have been ravaged by war for 40 years, so battlefields and refugees help me reinforce that theme to the players.
Feel free to borrow it and modify it as you like to add a little flavor to your games!
some ancient thing
- -skeleton or skull or creature(s)
- -shrine or roadside statue
- -battlefield
- -ruined village / town
caravan or merchants
- -lone farmer(s)
- -long distance caravan (with guards)
- -pilgrims
- -refugees
- -wedding / funeral / festival procession
- beggars, plague victims and horribly maimed veterans of conflicts begging for alms
bandits
- -local
- -roaming
other
- -party of adventurers (only up to 9th? level)
- -typical random encounter (monstrous)
tiny communities
- -farming / fishing / herding community
- -fey community (be careful!!!)
- -demi-human community (goblin etc)
local fauna
- -wild animals (after parties animals? will not fight to the death: at half HP will run away)
- -pack of starving wolves
- -bear and cub
- -puma / mountain lion, will stalk party and attack one of them (or a mount) when they are alone.
- -domestic animals
Posted in Encounter by Adam A. Thompson with 1 comment.
The Seat of the Seer
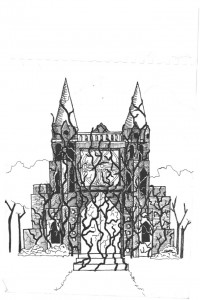
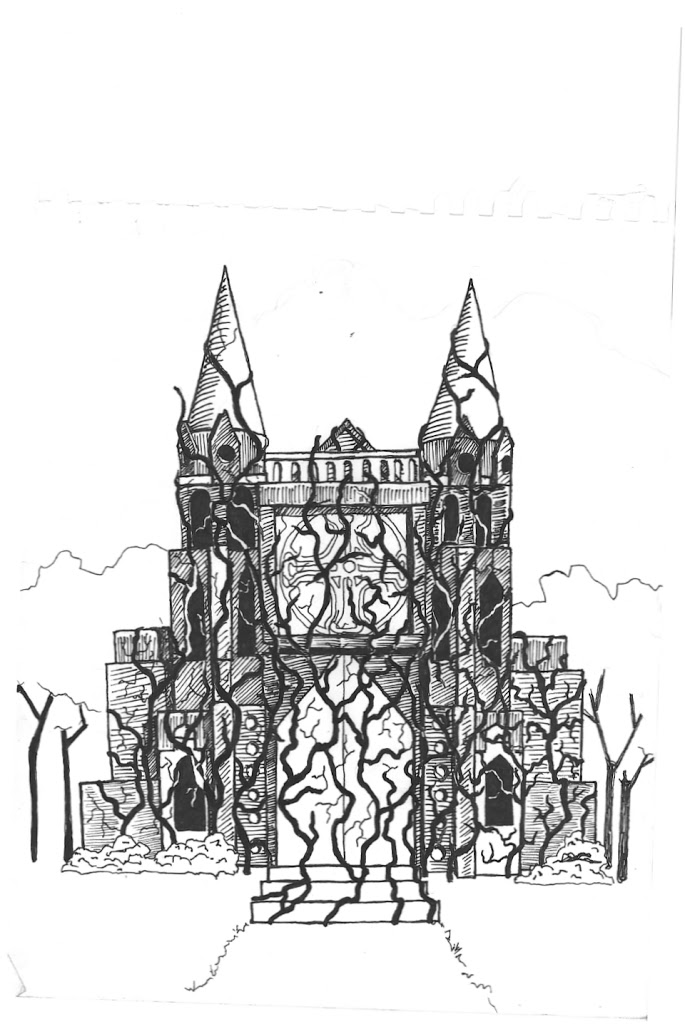
Presented here is the first encounter in the upcoming adventure “Anointing the Seer”. Here, a group of giants have taken up residence in a cursed cathedral. Dangerous magic briers guard the exterior, and within the brutes feast on the trapped townsfolk. Feel free to drop it into your games to use as you see fit.
Seat of the Seer
 Dungeon Features
Secret Doors in this area are priest-doors, concealed to appear to be part of the ornately carved stone or wood they are set into, and are a DC 18 Search check to find.
The Cursed Seat of the Seer (EL 12)
This temple is much transformed after the attack on it. It is surrounded by magical briars, and inside giants feast on the townsfolk, who have been polymorphed into animals.
Exterior
Surrounded by small outlying buildings, this large and stately temple is completely overgrown with gargantuan brambles, to the point where is is nearly concealed. A large double door can be glimpsed through the thorn-covered trunks of the plants.
In order to enter the temple via the doors one must somehow pass through the patches of brier brambles that block the doorways. If the plants are not killed then they must be defeated in an opposed strength check (DC 19) in order to open the doors. Other methods of entry include teleportation or flying or climbing up and breaking through some of the stained glass windows on the east face of the temple. Either method requires navigating the brambles, which will attempt to grapple the intruders.
Interior
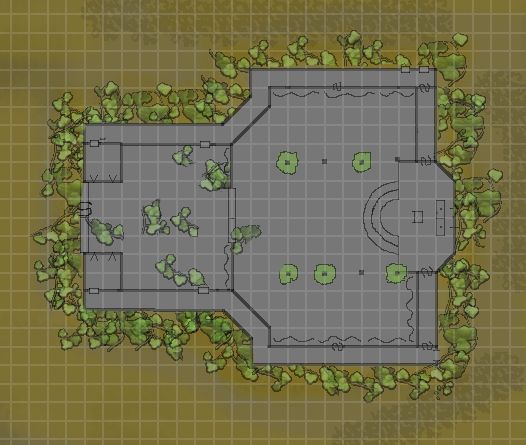
The smell of offal, greasy cooking fires and death permeate this area. The interior of the temple is also sparsely overgrown with patches of the thorny brambles which push up through the flagstones. Several dead peasants and acolytes are caught in their branches. The stone walls are adorned with tapestries of the Seer’s visions and the stories of the petitioners helped by them. Several carcases worth of bones lie upon the floor.
1/4 of the squares in the temple are grown over with brambles in approx 10′ patches in the first room of the temple. Some of the pillars also have brambles in the chapel.
Creatures: Nearly 100 domestic animals cower in the temple. They are the temple priests and townsfolk who had come to observe the coronation, polymorphed into sheep, pigs and dogs. Several giants and and an air elemental have been left behind by the vengeful family to ensure that the temple is not re-inhabited.
Ogre Barbarians (3): HP 79 each
Tactics: The brutes will likely be roused by anyone entering the temple and will have assembled to defend it. The giants may attempt to push intruders into the brambles as they fight, and will mercilessly bludgeon anyone caught in them. Similarly, the air elemental will attempt to scoop up the rear ranks of any intruders in its whirlwind form and drop them into the brambles. If the group is defeated, the air elemental will return to the warlock to inform him that someone has reclaimed the temple. The giants will fight to the death.
Traps: The exterior of the temple and portions of the first room are overgrown with the effects of the brier brambles spell. Anyone entering the area of the spells effect risks entanglement and the plants sleeping poison.
Treasure: Almost the only thing left in the temple’s treasury is a scroll of break enchantment that the temple priest (in his form as a ram) will bring to the party if they are otherwise unable to disenchant the villagers. The giants have little of value on them.
Development: Once the giants are slain and the elemental has fled, the party should be able to disenchant the remaining animals, who creep cautiously up to the PCs once the violence has ended.
Once freed they will relate what happened: the new priestess was in the process of being anointed when a holy trance came upon her. Her eyes rolled up into her head and she began speaking in a strange, strained, voice. “I see… doom! The drake… he is brought low by his son…” The peasants go on to inform their rescuers that a witch and two warlocks, one young and one of middle age, suddenly appeared in a burst of flame and interrupted the anointing of the new Seer and turned them all into animals. One of the older villagers, the abbot of the temple, will angrily go on to identify the witch as the evil old witch who used to live in the village, but was driven off years ago. Some say she inhabits a farm nearby in the wild woods, and the players will be given sketchy directions by one of the village’s hunters.
Attempts to scry upon the priestess will fail, as she is in the Dragon’s lair, which is warded against scrying.
Ad Hoc XP Adjustment: +15% for difficult terrain (the brambles)
Posted in Encounter and tagged Anointing the Seer, Location by Adam A. Thompson with no comments yet.
The Witch’s Watchdog
This is one of the first encounters in “Anointing the Seer“, an adventure coming soon from Unicorn Rampant. This big, bad wolf guards the entrance to the evil witch’s gardens in this fairy-tale styled adventure. Feel free to borrow it, or just Black Fang, for your games.
The Witch’s Watchdog (EL 12)
Here, an awakened dire wolf named Black Fang guards the entrance to the farm.
There is a break in the dense woods, revealing a clearing. A wooden arch, covered in green, thorny rose vines, marks the entrance of this small farmstead and stretches up high above your heads. A large yard and gardens stretch away before you. Shouts of revelry can be dimly heard from an enormous lodge house ahead to the left. To the right, behind extensive gardens, a two-story cottage sits among some trees at the far end of the clearing. Out of the darkness beneath the trees next to the arch a loud, low voice growls, “Who goes there?”
Creatures: An awakened dire wolf named Black Fang is the farm’s first guardian. He will challenge anyone other than the Sorceress or the giants who approaches the gate. He lurks in a dirt rut in the darkness a the foot of dense pine trees to the left of the gate (Hide: +14, +4 for cover = +18). A 100′ iron chain prevents him from ranging too far afield, and gives him a -4 on Move Silently checks. Conversation with him may allow the party to enter unmolested if they can bluff or bribe him, as he is not particularly loyal to the Sorceress. He is, however, a cruel, evil wolf, so he may demand that he be allowed to eat one of them for the others to enter. Either way, he readies a spring attack and tries to remain hidden in the shadows as soon as he spots or hears the anyone approaching.
Black Fang, CR 12
male awakened advanced dire wolf
chaotic evil large magical beast
Initiative: +7
Senses: Listen +32, Spot +32
Languages: common, sylvan, giant
AC: 22 (-1 size, +3 Dex, +3 natural, +7 dodge from Combat Expertiese), touch 18, flat-footed 14
HP: 225 (HD 25d8 + 100)
Fort: +18 Ref: +17 Will: +8
Speed: 50 ft.
Attack: bite +20 (2d6 + 19) – 7 point power attack, 7 point Combat Expertiese
Attack Options: combat expertiese, power attack, spring attack
Space / Reach: 10 ft. / 5 ft.
Base Attack: +25 Grapple: +37
SQ: Low-light vision, scent
SA: Trip (+39)
Feats: Alertness, Run, Track (from scent), Weapon Focus (bite), Improved Initiative, Combat Expertise, Dodge, Mobility, Spring Attack, Power Attack
Abilities Str 27, Dex 16, Con 18, Int 14, Wis 12, Cha 13
Skills: Hide +14, Listen +32, Move Silently +14, Spot +32, Survival +2*
Trip (Ex): When Black Fang hits with a bite attack he can attempt to trip its opponent (+38 check modifier) as a free action without making a touch attack or provoking an attack of opportunity. If the attempt fails, the opponent cannot react to trip Black Fang.
Tactics A cyclone of furry death, Black Fang fights with cunning. He will use his spring attack to keep out of reach of any dangerous fighters, and will use his whirlwind attack if he becomes surrounded. Any spellcasters who harm him badly will be sprung on and tripped, and he will then stand over them so that if they stand he can attack again.
Development: Unless the players defeat the Black Fang quickly, the nocturnal Harpy Archer in the garden may wake and raise the alarm. A battle is listen DC -10 to hear, and the sleeping harpy has a total -3 on her listen check. The gate is 120ft (-12) from her roost (-5 for the walls), however, so a roll of 10 or more on a d20 indicates she is wakened and will arrive and join the fight in 3 rounds.
Posted in 3rd edition Dungeons & Dragons / d20 fantasy / Pathfinder, Creature, Encounter and tagged Anointing the Seer by Adam A. Thompson with no comments yet.
The Chamber of the Old One

Now that The Horror of the Old Ones has been released, here is the final encounter in the adventure. To see more, check out the 56 page adventure at RPGnow.com here!
The short, slick slope leading from the last chamber ends here at the shore of a pool of briny water. The water surges with the pulse of the ocean, small waves lapping at your feet. To the left a large cavern stretches out.
This dark cavern swirls with strange mists, and high above the ceiling seems to fade and reappear in patches with the mist, revealing distant, bright, hard pinpoints of light in an inky blackness above.
At the far end of the chamber, in a crater shaped pool, stands an immense oval-shaped mass. It’s irregular surface is streaked with veins of purple, black and green minerals, and broken by a crack large enough for an ogre to pass through. Fragments of the strange oblong lie below the crack.
This 100 ft by 50 ft ovular cavern is the chamber of the Old One. Before the dawn of man, the old one’s cocoon traversed the spaces between the worlds. It crashed into the sea here, creating the Onuago bay and the mountain of rock called harpy point with it’s impact. DC 30 knowledge arcana or craft metalworking will reveal that the cocoon is made of iron, with veins of adamantium and magesilver throughout.
In the eaons since then, the sea’s ceaseless crashing and later the scrabbling of the Children of the Sea have excavated this place. Then, with his ritual, Ernaldus fully wakened the Old One, who burst out of it’s cocoon to sew madness and ruin in Onuago.
The pool of water leads to the sea at the west side deep below harpy point. The old one’s will has prevented the water from flooding in to fill this chamber up to this point.
The roof of this chamber is shiftingly transparent, and reveals the stars that wheel above regardless of the time of day or night.
Creature: the Old One dwells here, and is likely either in it’s vessel or out at the bottom of the bay. If in the bay, it should emerge from the briny pool and attack the party from behind as they examine the chamber and the cocoon.
Old One: HP: 175
Tactics: The Old One will likely begin it’s assault with a chain lightning and dominate person and then cast blink as it strides towards the party, allowing it’s wisdom draining gaze attack and it’s slow aura to do their work. As long as the party is not being particularly effective, it will use it’s melee attacks to slay them. If seriously threatened, it will retreat via dimension door, summon a chaos beast, and use lightning bolts to eliminate the most effective foe, be it spellcaster or warrior. The Old One will fight to the death.
Treasure: There are Adamantium and Magesilver deposits in veins in the interstellar asteroid. If somehow retrieved, they are worth approximately 50,000 gold.
Development: After the defeat of the old one, the sea rushes in to cleanse the chamber. The body of the old ones floats strangely and is washed out. As it passes, the players can make a DC 12 Strength check to grab it and hold on as they are carried out by the surging water. The body will quickly rise to the surface of the bay, and begin to drift towards Onuago on the now calm water.
Failing this, the party must swim (DC 13 swim checks, to travel 100 ft. to the surface of the Bay) or leave by magic.
The empty husk is deposited like a beached whale near the near the shore of Onuago.
Posted in Encounter and tagged Horror of the Old Ones, Location, Old One by Adam A. Thompson with no comments yet.
Locked in a Place Where No One Goes
First of all, Happy New Year, everyone! Hope you all have a safe and fun holiday, and many happy returns!
So, I ran this little adventure on Sunday for my players in the “Return to the Temple of Elemental Evil” game I’ve been running. For those who haven’t played that colossus of an adventure, near the end the players have a chance to draw from a Deck of Many Things. Almost immediately, two of the party members drew the Donjon and Void cards. I was afraid for a second that it was going to turn into a total party kill. Luckily the cleric and druid had some restraint drawing cards and only got the enmity of a powerful outsider and -1 to all their saves for the rest of their lives. All of it made me think the deck of many things is secretly the most effective trap ever created.
So, in an attempt to let the party re-unite and finish the adventure I whipped this side adventure up. It’s a one-session mini-adventure, written for 12th level characters, in which some party members are escaping from hell and some are coming to their rescue. The encounters are planned for a half-size party (2 characters in each encounter). See the footnote for hints on adapting the adventure for higher or lower level parties.
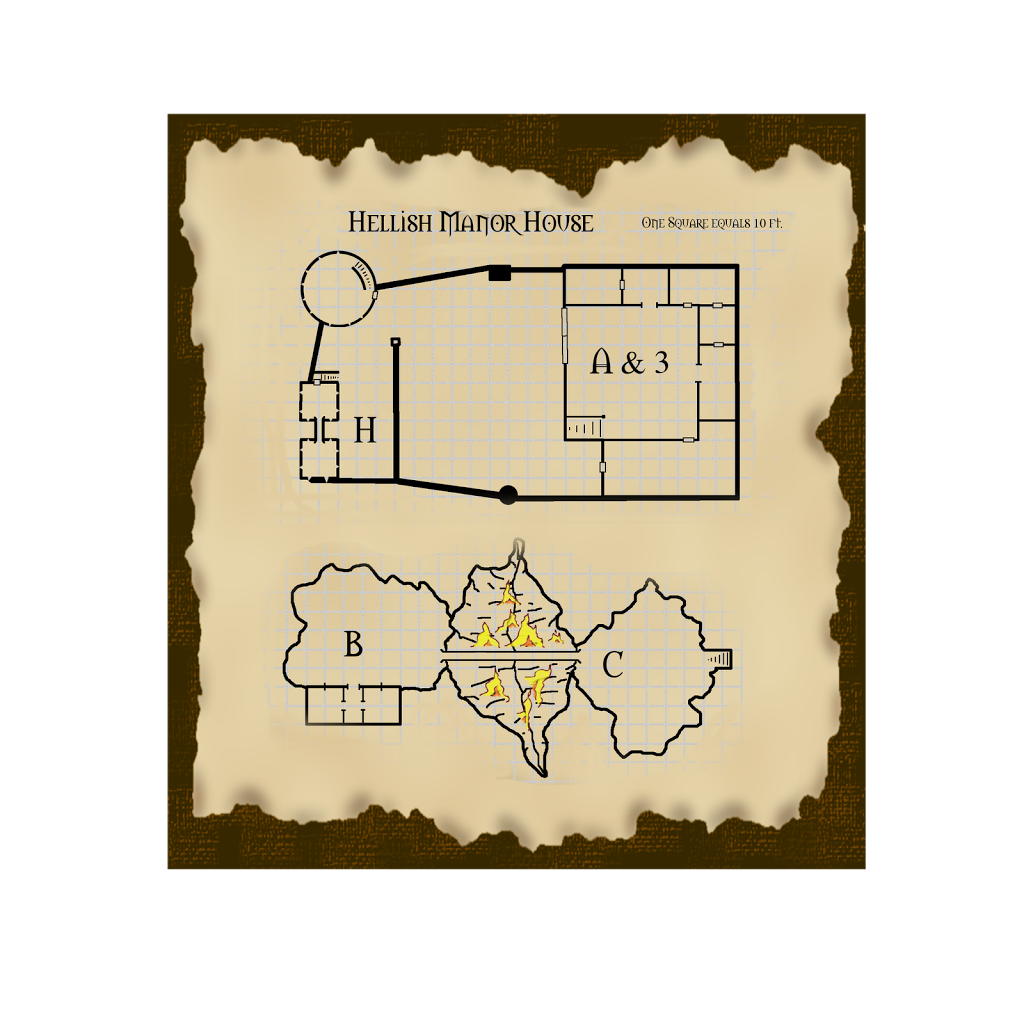
Setting: The adventure takes place in small fortified manor house on the first plane of hell. The manor is one of the domiciles of Vivarea, a powerful succubus, who has seduced, hired, and subjugated these devils to maintain her hidden villa. The surrounding region is a blasted shale landscape filled with pits of fire and twisted woods where condemned souls writhe in anguish.
Adventure Hooks: This adventure can easily be adapted to involve the rescue of an important NPC or a needed item from the dungeons beneath the manor. As a straightforward dungeon delve with a united party it would be an appropriate adventure for a full party of 8th – 10th level adventurers.
To begin the adventure, simply have the characters find a few magically trapped item that have Azeroth’s Snare, a spell similar to trap the soul, cast upon them. These items can be anything that the players would want, such as apparently enchanted magic items. The items in question will have been previously prepared by Azeroth, their trapped nature disguised (maybe via nistul’s magic aura), and perhaps had an attraction spell cast upon them to lure in the intended victims.
Trap: hell’s lure CR 10; magic device; visual trigger (true seeing); single use; triggers when touched; spell effect (Azeroth’s Snare, 17th-level wizard, teleported, without their equipment, to a magic trap at location of caster’s choosing, DC 30 Will save negates); Search DC 34; Disable Device DC 34.
Background: The outre story of how my players pissed off a succubus while raiding the Temple of All Consumption… will probably not make the pages of Claw / Claw / Bite ! Email me if you’re curious.
Running the Adventure: In order that the halves of the split-up party don’t get too bored, and also to increase the tension and build to the final encounter, the encounters should be run in this order:
1) The prisoners are captured.
2) The rescuers find out where they are being held, travel to hell, fight the hellcat encounter.
3) The prisoners slip out of their cell and escape the prison area.
4) The rescuers get to the manor and begin fighting the guards.
5) The prisoners fight their way over the bridge, past the hellhound.
6) The rescuers finish their fight against the guards.
7) The prisoners travel through the living areas up to the entrance to the main hall.
8) The rescuers start fighting the succubus; the prisoners join in after d2 rounds.
Encounters
1) Encounters for the Prisoners
A – The Devil Mocks Their Every Step (CR 23)
This encounter explains the character’s capture: the succubus has contracted with a powerful daemon, named Azeroth, to capture the characters for her, and here she gloats over her success.
Area Description:
This grand hall of dark stone soars up with gothically carved pillars and arches to a high ceiling. A grand iron double door stands shut and barred, and several smaller doors and archways lead to smaller antechambers. A wide stone staircase leads down into the darkness.
You stand in a glowing magic circle in the middle of this hall. Your names are written along the border of the circle, along with many runes you cannot understand. Standing at the ready around the circle are dozens of armed devils of various types, wrapped in hooked chains, bearded with cruel-looking axes, their melted bodies pouring out in globs from their chainmail.
There is an incredibly beautiful woman here, dressed in revealing silk robes and adorned with gem-dripping jewelery of all types. A large pair of leathery wings are folded at her back. She turns and thanks a tall, robed figure, who holds a crystal-topped staff, and who’s hood hides in shadow a skeletal dog’s head with glowing red eyes. She then addresses you, saying: “Your interference in my families affairs in the mortal world are at an end! Now I will pay you back for my daughter’s humiliation! Oh the tortures of the damned lie in wait for you, you wretched things.”
The robed figure’s fanged, skeletal mouth creaks open and issues forth a single magic word that knocks you to the ground, stunning you. A horde of horrid, melted looking humanoids in mail surge forward and clap you in irons, then drag you, in chains, to dungeons below.
Creatures: The house’s entire contingent of devils is here at this encounter, in case the characters get out of hand. In addition to Vivarea and Asteroth, there is a chain devil, a bearded devil, and a dozen lemurian footmen. Asteroth, a 17th level wizard, has been paid be Vivarea to capture the player’s characters, and will use whatever spells he must to subdue the party if the resist their parade to the cells below, such as or power word stun or dominate monster.
B- Escape! (EL 6)
In this encounter, the prisoners must trick or fight their way out of their cell and the underground prison / torture area where they are being held. They must overcome or evade their guards and the magical ward sealing them in.
Area Description:
This small cell’s walls and ceiling are made from large blocks of stone. Through an open archway, its stones covered in strange runes, lies a short hallway and more cells. A small window, filled with thick iron bars, looks out into a large cavern. There, in the dull red glow from distant flames, several racks, iron maidens, braziers with hot coals, and other torture implements are being used by a scaly, bearded devil and several horrible, melted-looking guards. The screams of their victims echo back to you.
A DC 10 search check will reveal that the other cells in the hallway have only a single rune carved on the outward facing side.
Creatures: One bearded devil and three lemurian footmen work here tormenting a few anguished damned souls. They keep an eye on the characters, but are busy at their work and take 10s on their spot and listen checks. The bearded devil leaves occasionally, providing an opportunity to try to somehow trick the footmen into releasing the prisoners.
Bearded Devil: HP: 45
Lemurian Footmen (see below): HP: 10, 7, 10
Tactics: If taunted or otherwise engaged these torturers may come to the cells and perhaps stab at the prisoners through the arches (which are warded one-way). When the prisoners escape the guards will rush them and attack with their weapons.
Trap: Lightning ward on cell entrance: This ward prevents anyone from exiting the cell. Anyone trying to pass under the arch will cause the infernal runes carved across its face to flash. The creature will suffer 2d6 points of electricity damage and be thrown back. To pass through this trap, it must be dispelled (8th level caster), disabled by covering the runes (DC 29 Disable Device check), or one can push through it with a Strength check (DC 25), which also causes 4d6 points of electricity damage. From the outside, the ward can be suspended by covering the single rune carved on that side of the arch.
CR 5; spell; spell trigger; automatic reset; spell effect (shocking grasp, 8th-level sorcerer, 2d6 electricity, no save); Search DC 29; Disable Device DC 29.
Treasure: 3 suits of chainmail, 3 spears, a glaive and a shortsword from bearded devil. Also, weapons can be improvised from torture implements.
C – The Dogs of Doom (EL 8 + 10% xp bonus)
Here, the escapees must bypass tricky spot with a hell hound guard on a narrow bridge over a pit of lava and fire.
Area Description:
Here, a narrow bridge of stone stretches across a deep chasm, filled with molten rock and towering tongues of flame. On the far side a smaller cavern is empty, save for stone stairs leading upwards.
Creatures: 1 nessian hell hound without barding lies in wait here.
Nessian Hell Hound: AC:18 HP: 111
Tactics: The hell hound, with a hide of +17, it will stalk across the bridge and try to attack anyone crossing with surprise. It will probably open up with it’s breath weapon if it’s opponents are clustered up, otherwise it will bite.
D – The Halls of the Damned
This level of the mansion consists of several underground hallways with small suites and rooms attached. These rooms include the quarters of the chain devil and the bearded devil, as well as the suite Viveria uses when she stays here. If searched, those rooms yield the treasures below, each secured with it’s own trap. The majority of the rooms, however, are empty.
Bearded Devil’s chambers
description etc
Trap:
Treasure: 57pp 70gp 19cp, and a small masterwork heavy crossbow.
Chain devil’s chambers
description etc
Trap:
Treasure: 3 platinum coins, an arcane scroll containing: knock (lvl 2, cast 3), ray of enfeeblement (lvl 1, cast 1), and cat’s grace (lvl 2, cast 3), an arcane scroll containing: shocking grasp (lvl 1, cast 1), magic circle against evil (lvl 3, cast 5), and an arcane scroll containing: command undead (lvl 2, cast 3).
Viveria’s chambers
description etc
Trap:
Treasure: 4,785gp 4sp 1cp, a gold dragon comb with red garnet eye worth 1.000 gold, a silver chalice with lapis lazuli gems worth 80 gold, a fire opal pendant on a fine gold chain worth 1,100 gold, a black velvet mask with numerous citrines worth 80 gold, and a divine scroll with speak with dead (lvl 3, cast 5).
2) Encounters for the Rescuers
E – Determine Location
The first step of the adventure for the rescuers is to determine where the prisoners are being kept. Options for the rescuers could include the following:
- scying or using divination such as commune or contact other plane
- examining the trapped items via analyse dweomer or identify, combined with a spellcraft check (DC 24) to determine where the trap teleported them to.
At that point, the players must travel to hell (or wherever you set the manor house) via plane shift, teleport, through planar portals, or however is appropriate for the situation.
F – The Damned
Here the players pass through a small woods, where damed souls, in the form of trees, suffer. These petitioners are helpless, harmless, and horrifying.
Area Description:
The players enter a thicket of uncanny trees. The tree barks have faces etched into them. Upon closer examination, the wood of the trees is squirming with maggots, ants and spiders burrowing in and feasting on their bodies. They stir, and a cacophony of laments soon fills the air as the trees mutter and scream and cry and rant against the crimes that damned them in their mortal lives.
G – Hellcats (EL 9)
Here, a few examples of hell’s native fauna attempt to predate the rescuers.
Area Description:
The dessicated landscape is eerily quiet here. Loose shale crunches underfoot. Everything is gray: the sky, the ground, the few skeletal trees that occupy the landscape–all sucked dry of color. A faint smell of rotten flesh permeates the air.
Creatures: 2 hellcats HP: 54, 69
Tactics: Listen checks against the hellcat’s move silently +20 may be the party’s only warning before they are attacked. Invisible, these hellcats will pounce upon the rescuers and fight until brought to less than 20 hit points, at which time they will flee.
H – Legions of Hellions (EL 10)
Here the rescuers must fight waves of guards to enter the manor.
Area Description:
Glistening walls of dark grey stone rise to protect the villa. Near the top, the crenelated walls slope inward slightly, perhaps to provide some cover from aerial attacks. Directly ahead of the players stands the black ironwood gates. Lemurian footmen stalk among the battlements. Though these Lemurians have a modicum of intellect, they still behave with nervous tics and gibber to themselves about their fiendish thoughts.
Creatures: There are several groups of footmen through the compound, and as the party fights their way in they should encounter several waves of the footmen, and then finally the chain devil, in the locations listed below. All the lemurian footmen have HP:9.
6 lemurian footmen guarding the gate
2 lemurian footmen reinforce right away from the gate towers
4 lemurian footmen from the circular tower as the players pass it
4 lemurian footmen are stationed in the courtyard
4 lemurian footmen reinforce from the kennels
4 lemurian footmen wait at the house entrance with the chain devil (HP: 55)
Tactics: The footmen are quite stupid, and will simply charge the players with their spears. If the end up surrounding a player or two, they may try to grapple them and bear them down under their numbers. If the footmen are slowing the rescuers, the chain devil may try to disarm them, otherwise he simply attacks. All fight to the death.
3) Encounter for the Party Reunited (EL 14)
In this encounter the characters all confront the Succubus Boss in the middle of the lair – in the main hall of the manor. The encounter should start with the rescuers coming into the hall, and the escapees should join the encounter after a round or two from the stairs below.
Area Description:
This grand hall of dark stone soars up with gothically carved pillars and arches to a high ceiling. A grand iron double door gives access to the courtyard beyond, and several smaller doors and archways lead to smaller antechambers. A wide stone staircase leads down into the darkness.
Creatures: Here Vivarea will make a final stand against the party. Every round or two a pair of lemurian footmen will join the fray, for a total of six.
Vivirith succubus sorcerer 8 (see below)
6 lemurian footmen: HP 9 each
Tactics: The succubus will begin by casting a hot fire shield, and then retreating from the party, using her greater teleport if necessary, and hurling fireballs and lightning bolts while the Lemurian Footmen harass the party. If she is somehow cornered, she will cast shield and vympyric touch. If seriously hurt she will attempt to teleport to safety, to plot against the party for another day.
Creatures
Lemurian footman (CR 1)
Lawful Evil Medium Outsider (Evil, Extraplanar, Lawful)
Environment: A lawful evil-aligned plane
Organization: Solitary, pair, gang (3-5), swarm (6-15), or mob (10-40)
Initiative: +0
Armor Class: 19 (+5 armor, +4 natural), touch 10, flat-footed 19
Hit Dice: 2d8 (9 hp)
Saves: Fort +3, Ref +3, Will +3
Speed: 15 ft. (3 squares)
Attack: Claw +2 (1d4) or spear +2 (1d8)
Full Attack: 2 claws +2 (1d4) or spear +2 (1d8)
Base Attack/Grapple: +2/+2
Space/Reach: 5 ft./5 ft.
Special Qualities: Damage reduction 5/good or silver, darkvision 60 ft., immunity to fire and poison, mindless, resistance to acid 10 and cold 10, see in darkness
Abilities: Str 10, Dex 10, Con 10, Int 5, Wis 11, Cha 5
Possessions: chain mail, spear
A lemure is about 5 feet tall and weighs about 100 pounds.
Lemures are typically mindless, but these souls have clawed their way up through the ranks of devils a half-rung, and have gained simple minds.
Combat
Lemurian footmen are simple combatants, lurching forward and attacking with their claws or whatever weapons they may have been given.
A lemure’s natural weapons, as well as any weapons it wields, are treated as evil-aligned and lawful-aligned for the purpose of overcoming damage reduction.
Vivarea, Succubus Sorcerer (CR 14)
Chaotic Evil Medium Outsider (Chaotic, Extraplanar, Evil), Sorcerer 8
Initiative: +1
Armor Class: 24 * (+1 Dex, +9 natural, +4 armor), touch 11, flat-footed 19
Hit Dice: 6d8 + 8d4 + 14 (65 hp)
Saves: Fort +8, Ref +8, Will +13
* includes Mage Armor
Speed: 30 ft. (6 squares), fly 50 ft. (average)
Attack: Claw +11 melee (1d6+1)
Full Attack: 2 claws +11 melee (1d6+1)
Space/Reach: 5 ft./5 ft.
Base Attack/Grapple: +10/+11
Feats: Dodge, Mobility, Persuasive, Still Spell, Spell Focus (Enchantment)
Special Attacks: Energy drain, spell-like abilities, summon demon
Special Qualities: Damage reduction 10/cold iron or good, darkvision 60 ft., immunity to electricity and poison, resistance to acid 10, cold 10, and fire 10, spell resistance 18, telepathy 100 ft., tongues
Abilities: Str 13, Dex 13, Con 13, Int 16, Wis 14, Cha 28
Skills: Bluff +28, Concentration +18, Craft (jewelery) +7, Craft (traps) +7, Diplomacy +13, Disguise +17* (+19 acting), Escape Artist +10, Hide +10, Intimidate +20, Knowledge (arcana) +12, (the planes) +11, Listen +19, Move Silently +10, Search +12, Spellcraft +11, Spot +19, Survival +2 (+4 following tracks), Use Rope +1 (+3 with bindings)
Spells Available: (DC 19 + spell level, +1 for enchantment)
1st (9): mage armor, shield, magic missile,
2nd (8): scorching ray, invisibility, mirror image,
3rd (7): fireball, lightning bolt, vampyric touch
4th (5): fire shield
Adapting the Adventure
To adapt this adventure for parties of higher or lower level, not much needs to be changed. Add or subtract levels of sorcerer from the succubus so that she is 2 CR higher then the average party level.
All area descriptions copyright 2007 Unicorn Rampant Publishing
Posted in Encounter and tagged Location by Adam A. Thompson with no comments yet.
Restoration of Peace in the Lands of Baron von Steiglitz
Here is a series of encounters that are the culmination of the Castle Stieglitz adventure, and that, if the player’s hearts are true, will result in peace and reconciliation.
These encounters are the second climax and the resolution of the adventures surrounding Castle Stieglitz. Below are presented the camps of the rogue lieutenants of Baron Stieglitz, where the players must go to confront them. In each case, there is the option to attempt to bring the rogue commanders of the Baron’s fractured army to heel under the command of the Baron or Anna. Failing that their commanders must be defeated in order to consolidate power. Anna or the Baron are magnanimous in their victories, and offer amnesty to soldiers who will return to the Stieglitz army.
In either case, the task becomes easier as the lieutenants are recruited. If the Baron still lives and has been redeemed, convincing the other Lieutenants to join his army again is at a +2 bonus on the Diplomacy checks. Also, each lieutenant other than Anna recruited gives the party an additional +2 on the diplomacy check.
If the party comes into conflict with the lieutenants and fighting breaks out, the low-level warriors on both sides will fight each other while the Lieutenant in question and the party fight it out. Assume that there are approximately equal casualties on either side among the low-level warriors.
Anna’s Approval
Here in Talook, Anna, mayor Orlay Petronova and the visiting clergyman are all very interested in what the players discovered in the castle. If the players have redeemed the Baron, all three are relieved and declare their support of him. If the Baron is dead, the three soberly turn to the matter of succession. As Anna červená has the clear support of Orlay and is the only one of the four who did not abandon their duties, she is the obvious choice. The visiting pointiff will happily coronate Anna as the Baroness of Stieglitz the next day.
Either way, the conversation turns to subduing the other lieutenants-turned-bandits; Karl Underharl, Yevgeny Divoký, and Petry Pokrm. The party is asked to help once more, by accompanying Anna or the Baron as their honor guard and champions. If they are reluctant to help they are offered 1,000 gold coins for their assistance.
Development: From here the party will journey, along with Anna, her troops, and the Baron if he is present, down the road from Talook to Onuago. Along the way they will first confront Karl Underharl at his camp in the mountains. It takes two days for the troops to be ready to go, so the party has a chance to rest before they leave.
Karl Underharl’s Mountain Camp
As the party nears the camp a lookout on a tall crag sounds a note on his horn.
Further up mountainous the trail past pine trees and shrubs there is a small, rocky camp. Several wooden shacks and patched tents stand in a small circle in this mountain clearing. A few empty-looking barrels and crates stand near a small cooking fire in the center of the camp, where a couple of small pheasants are roasting on a spit.
Several dozen armed men in mail stand at the ready here. Karl walks out and begins to parley with the group, “What do you want?”
Karl’s dislike of women makes convincing him to re-join the army difficult if Anna in the new ruler of the Stieglitz lands. If she is in charge, his attitude is unfriendly, and the diplomacy check is DC 25, and a result of less than 5 results in Karl flying into a rage and ordering his men to attack. If the Baron has been redeemed his attitude is indifferent and the DC is only 15. In either case, offering new supplies or good wages (excess of 1sp per day per man) gives a +2 circumstance bonus.
If Karl refuses to rejoin the Stieglitz army, Anna or the Baron will set their jaw and declare that if he will not join them, they are outlaw bandits. The two sides will then join battle.
Creatures: Karl, and a handful of stout warriors will fight with the party while both side’s lower-level fighters do battle.
Karl Underharl: HP: 64
5th level fighters (4): HP: 32, 22, 29, 26. AC 18. For other stats see DMG. All have bastard swords, large shields, chain mail and heavy crossbows.
Tactics: Karl and his four knights will approach in formation and fight side by side with sword and shield.
Treasure: One of the wooden shacks contains the band’s treasury: a single lock box, to which Karl has the key. It contains the proceeds of the toll the group has been exacting: nearly 3000 gold worth of mixed coin. Anna or the Baron will offer to split these monies with the party for their help in handling Karl.
Development: If badly wounded, Karl will yield and ask for mercy. At this point he can easily be compelled to rejoin the army, or failing that will agree to exile or whatever is necessary to save his life.
From here the party has the choice of going to Onuago to confront Petry or into the wilderness northeast of Onuago to treat with Yvnegy.
The Dish-Eater’s Camp
Here, a mile north of the road from Onuago to Talook and castle Stieglitz, in the midst of weedy, abandonded fields, stands a large manor house. Above, its windows loom dark and broken over a raised proch. Steps lead up to the open door, where Petry Pokrm the Disheater leans upon the jamb. Leering, dirty men in leather and mail grin down from the porch and windows, fingering the hilts of their blades.
When the party arrives, the Petry will greet them from the steps of the manor house he has set up in. Surrounded by a gang of theives and warriors, he will negotiate with the Stieglitz representatives.
Petry’s initial attitude is unfriendly, and a DC 25 diplomacy check is required to convince him to join with the Stieglitz forces again. A result of 5 or less will cause him to become hostile, and he will order his men to attack. The usual bonuses apply: +2 for each other captain brought back into the fold, and +2 if the Baron has been redeemed.
If Petry cannot be convinced, Anna or the Baron pronounce him an outlaw and order an attack.
Creatures: The Dish Eater, a couple of fighters, and a pair of rogues will fight with the party while the armies clash around them.
Petry Pokrm HP: 120
5th level Fighters (2) HP: 40, 37 For additional stats see DMG
5th level Rogues (2) HP: 25,16 For additional stats see DMG
Tactics: Petry will fly into a rage and attack wildly, using his various weapons to trip and disarm his opponents. His men will move to flank and separate opponents, ganging up on them if possible.
Treasure: His recent career of organized looting and thievery has landed Petry with much of the wealth of Onuago. Arrayed around his chambers in the manor there are 324 platinum coins, 2563 gold coins, 3,400 silver pieces, and 21,548 copper coins in chests and sacks. In addition, there are 2,650 gold worth of art objects and 4,000 gold worth of gems to be recovered. Finally, among the treasure, there is a Ring of Force Shield and an arcane scroll with cloak of the sea and mage’s sword inscribed upon it.
Anna or the Baron may be slightly reluctant to part with all this wealth, and a DC 15 diplomacy check is required to convince them to give half of it to the party. Even if the party fails to convince them, they will begrudgingly give 1/4 of the wealth and the magic items to the party as their share of the spoils of war.
Development: Petry will fight to the death, but for the most part his men will surrender of flee if he falls.
Yevengy and the Wyndm
Here, between the swamps surrounding the lazy river to the west, and the rocky crags of the Cyruk Mountains to the east, on a broad, flat hilltop is the camp of Yevgeny the Fierce.
Gathered around the sides of the hill are many small tents and huts. Going about their daily business are families of the nomadic Wyndm people, apparently drawn to this place and forming some type of settlement.
A group of men with bows slung across their backs and swords at their hips approaches from the hilltop. At their center, frowning, and with a wolf at his side is Yevgeny the Fierce.
Yvengy and his Wyndm are not interested in fighting against or joining with the Steiglitz army, regardless of who is in charge. Instead he wants to protect his people, the Wyndm folk.
As Yevgeny is indifferent, an easy diplomacy check (DC 15) is all that is required for him to agree with a non-aggression pact with the Baron or Anna. He will agree that the Wyndm people will not encroach on their lands as long as they are left alone to live in peace. A DC 30 diplomacy check can convince him to re-join the Stieglitz army. He will not fight unless attacked.
However, another DC 15 diplomacy check by the party is required to convince Anna or the Baron to agree to this non-aggression pact. Even if they do not agree, there is no real grounds for conflict here, and only a major botching of the situation by the party should result in combat.
Creatures: If it somehow comes to a fight, Yevgeny and his best rangers will fight against the party.
Yevgeny Divoký the Fierce HP: 68
5th level rangers (4) HP: 29, 20, 24, 25. See DMG for further stats.
Tactics: If pressed into combat, Yevgeny and his rangers will lead a retreating skirmish, firing their bows as they drop back, covering the retreat of the people gathered here and drawing aggressors up the hill and away from the Wyndm.
Ad Hoc XP: If the party manages to negotiate a pact between the Wyndm and the forces of Castle Stieglitz, it represents a major accomplishment for peace in the region. In addition to being awarded XP for and EL 10 encounter, the party gains the trust and respect of the Wyndm folk, and eventually regional fame for their part in negotiating a lasting and fruitful peace between the old and new peoples of the area.
Posted in Encounter and tagged Journey to Castle Steiglitz by Adam A. Thompson with no comments yet.
Shadow Mastiffs
Here’s another encounter from the upcoming adventure The Horror of the Old Ones. A group of shadow mastiffs hunt this portion of the Elsemere Woods.
Here in the deep shadows of the thick canopy, beyond the foliage to the side of the trail, there is a gully with what appears to be a deep cave or burrow in it’s side.
Creatures: a pack of shadow mastiffs calls this cave home. Having heard the approaching party, they have spread out along the path in two pairs and wait in the shadows, with total concealment due to their shadow blend ability.
Shadow Mastiffs (4): HP: 27, 27, 28, 29
Tactics: The two pairs will pounce on, flank and trip the two weakest looking party members. If successful in tripping someone, one will take the opportunity on their next round to howl, hoping to panic and scare off those not being attacked. If brought to half hit points the dark hounds will pull back and howl, hoping to thin the numbers of their foes. If unsuccessful in scaring anyone they will flee once brought to 1/4 hit points.
Treasure: Within the cave, amongst the bones of many creatures, there are 200 gold, 2000 silver, a jeweled anklet worth 1000 gold, and a ring of blinking (worth 27,000 gold).
Posted in Encounter and tagged Elsemere Wood by Adam A. Thompson with no comments yet.
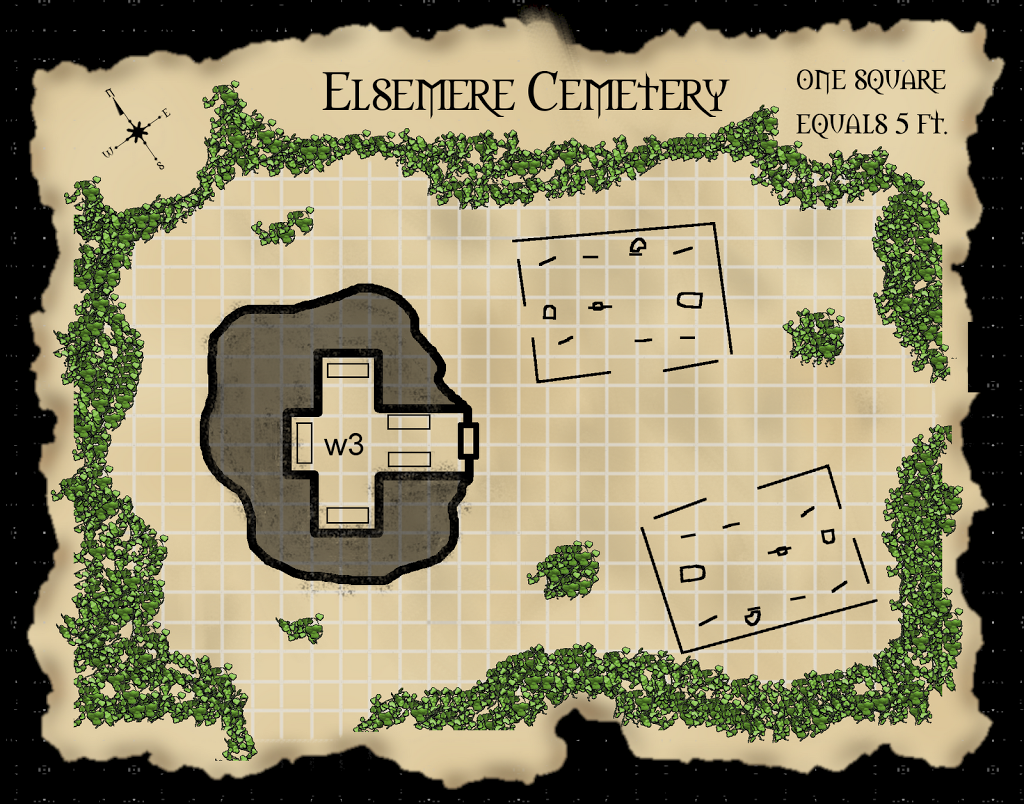
Elsemere Wood Cemetery
These encounters will be appearing in the upcoming adventure The Horror of the Old Ones. In the meantime, feel free to drop them into your game wherever you need a creepy old cemetery. And who doesn’t need a monster-filled cemetery?
Cemetery (EL 5)
creatures: begotten of the old one (1): HP: 70 A begotten of the old ones lives here. Born a child of the sea to one of the families in Elsemere, he grew up as a shut-in, hidden by his parents from the rest of the village. Upon his patents death he was discovered and driven out of the village. The maddening dreams of the wood have made him quite mad, and now he will viciously attack anyone entering the cemetery.
Mausoleum (EL 9)
Inside the crypt there are four carved stone coffins. Two of the sarcophagus lids have been pushed open by tree roots, and an intricate brass sword stand lies toppled over at the head of one of them.
Several shriveled corpses with various armors and dusty equipment lie scattered on the ground here.
Anyone approaching within 30 ft of the death root becomes subject to it’s fatiguing radiance and must succeed on a DC 15 Fortitude save or become fatigued.
Investigating the bodies, a DC 20 heal or spot check, reveals that they were crushed and drained of blood through many tiny wounds.
creatures: death root (1): HP: 63 A death root – the tree – is on top and inside the crypt and will attack anyone entering once they have come inside.
treasure: Here there are several dead adventurers and their gear, plus loot from the sarcophagus. All together it amounts to 1,200 gold, a smooth marble scepter worth 600gp, an intricate brass sword-stand worth 90gp, an arcane scroll containing: gentle repose (lvl 3, cast 5), sleep (lvl 1, cast 1), and undetectable alignment (lvl 1, cast 1) (450gp value). Additionally there is a +1 longsword (2,315gp) and another arcane scroll containing: feather fall (lvl 1, cast 1), bull’s strength (lvl 2, cast 3) and glitterdust (lvl 2, cast 3) (150gp) (325gp value).
Posted in 3rd edition Dungeons & Dragons / d20 fantasy / Pathfinder, Encounter and tagged Elsemere Wood, Horror of the Old Ones, Location by Adam A. Thompson with no comments yet.
Mad Treant
Suddenly a tree to the side of the path ahead falls and crashes onto the trail, blocking it. The tree then begins to move strangely as though writhing, and a low groan can be heard. After a few moments the tree is upright again, but swaying violently. It’s lower trunk separates into two leg-like appendages and it begins lurching slowly towards you. A face can be made out on it’s trunk and it babbles incoherently in a mix of common and sylvan.
Creatures: This normally benevolent forest creature has been driven mad by the evil influence of the woods. When it reaches the party it acts as though under the effects of a confusion spell: each round it has a 40% chance of attacking the nearest creature, a 10% chance to act normally, bemoaning the evil in the forest, a 20% chance of fleeing, and a 30% chance to babble incoherently.
If the players cast remove curse, break enchantment, or heal the wisdom damage it has suffered, the treant becomes friendly.
Darkmoss the Treant: HP: 77
Development: If the players manage to cure Darkmoss’s insanity, it may become a valuable ally. It knows about Father Ernaldus and the Shada Monks, and believes they are somehow tied to the evil in these woods. If asked it will join the players in tracking down and fighting them, and can lead them to the monestary by way of the ruins. It is not interested in helping the party beyond the woods.
Posted in Encounter and tagged Elsemere Wood, Horror of the Old Ones by Adam A. Thompson with no comments yet.