Location: Thorp of Talook
Nestled at the foot of the Cyrűk mountains, the thorp of Talook’s stone hovels are visible for many miles down the road. Tiny plumes of smoke rise from each of the huts set close together for protection.
When the party arrives, the citizens are busy setting up a makeshift celebration to honor St. Zelnyeki the following weekend.
Population: 58
GP Limit (price of most expensive item available in thorp): 40gp
Ready Cash: 116gp
Power Center: conventional (Anna Červená), LN (with good tendencies)
Highest Level Locals:
Adept: 1st
Barbarian: 1st
Cleric: 1st – Caretaker of the tiny wooden chapel that is the spiritual center of the town.
Commoner: 5th
Expert: 5th
Figher: 4th – Orlay Petronova – older man, appointed by the Baron’s father as magistrate of Talook. Orlay supports Anna as the last legitimate authority for the region.
Monk: 1st – An ascetic who has taken a vow of silence and lives on the church grounds tending the communal gardens.
Ranger: 2nd
Warrior: 2nd
Posted in Uncategorized and tagged Horror of the Old Ones, Location by Stephen Hilderbrand with no comments yet.
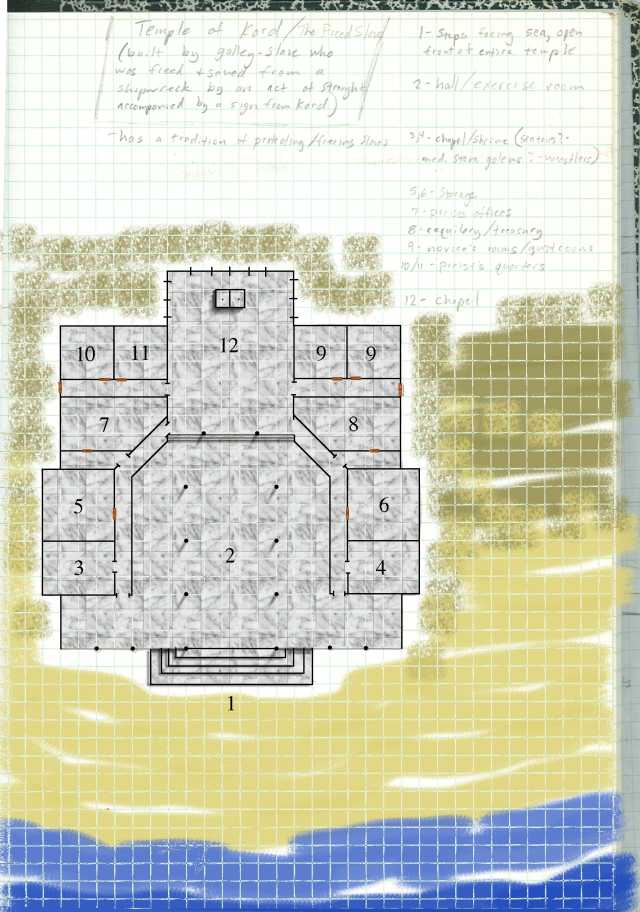
Location: The Temple of the Freed Slave
This temple was founded many years ago by a former galley slave who became a worshiper and priest of Kord.
As a galley slave the ship he was rowing was breached and began to sink. As he and all the galley slaves began to be pulled under the frothy salty water the ship’s wheel, broken from it’s place, was pushed against his chest by the rushing waters. The wheel broke such that all that was left were eight of the spokes, in the shape of the holy symbol of Kord. The slave felt a sudden rush of strength and broke the chains dragging him and his rowing-mates to the briny deep. They floated on the wreckage until they washed ashore. Praising Kord for their freedom and their lives, the galley slave founded a temple on the spot.
Over the years the temple has become famous throughout the region because the priests of the temple will give sanctuary to any slave that comes to their temple. Many eventually join the clergy there, others eventually leaving, with help from the priests, to start new lives once they are no longer sought after.
 Locations
1 Steps and Entrance
The huge open face of this temple is supported by strong marble pillars and looks our over the sea to the horizon. The sandy beach leads to large steps that rise to the huge chapel.
2 Hall and Exercise Room
This large room’s lofty ceiling is supported by large marble pillars. The sight, sound and smell of the unstoppable sea fill this hall from one end, while a wide set of steps lead up to a chapel to Kord, at the end of which light streams through stained glass windows, tinted red and gold.
Often this room is host to groups of worshipers, priests and slaves given sanctuary. They spend their time discussing the merits and philosophy of Kord and engaged in physical contests such as wrestling.
3, 4 Chapel (EL 10)
An open archway leads into a small serene chapel decorated with holy symbols and icons of various good deities. A life-sized bronze statue stands on a pedestal near the archway.
Creatures: Bronze Golems (1 or 2). These sentries guard the inner areas of the temple in the wings. If they detect strong evil in those entering they will leap down off their pedestals and seize the interlopers, wrestling them to the ground until the priests of the temple can come and decide their fate.
5, 6 Storage
Bags, barrels, crates and shelves hold the supplies of this temple.
7 Priest’s Offices
8 Requilary & Treasury
9 Novice’s and Guest’s Rooms
10, 11 Priest’s Quarters
12 Chapel
This chapel features a smooth altar to Kord carved from red-veined marble, with Kord’s wheel engraved on the front. Tall stained glass windows fill the back and sides of the room with a soft light. The windows depict the galley slave being granted the strength to save himself and his shipmates by the benevolence of Kord, their tenacity drifting on the open sea, and the founding of the temple on the sands, along with other scenes glorifying Kord.
Note: this temple is based on stories from the ancient greeks. The greek’s first historian retells the existence of a temple to Herecles which stood on the shores of Egypt that had the same policy of sheltering escaped slaves. As such it can be changed to suit your game world by dedicating it to whatever gods of strength or freedom you choose, or altering it in any other way.
Posted in Encounter and tagged Location by Adam A. Thompson with no comments yet.
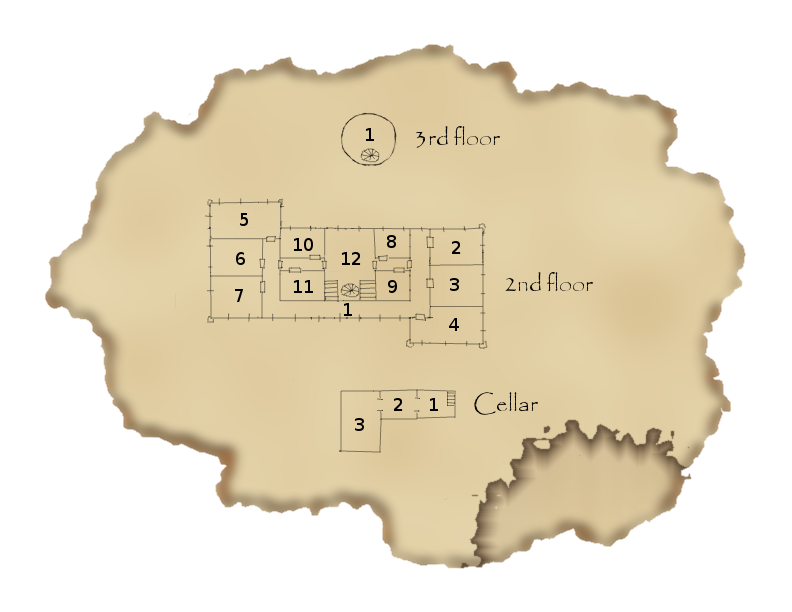
Location: Castle Stieglitz – 2nd and 3rd floors and Cellar

2nd floor:
1 Hallway
The light makes a shifting patchwork on the floor as the party passes through the broad halls.
2-7 Quarters
The quarters are full of eight slashed beds. It appears that anything of value has already been removed from these walls.
8 Petry’s Room
A single small window looks out to the grounds at the back of the Steiglitz property. Like all the other areas inside this castle, the room has been completely looted. The mattress of the bed has been slashed open and its innards lie strewn across the floor. A chair lies on its side and the desk has several deep gashes as if struck by a handaxe or other small chopping tool.
9 Yevgeny’s Room
This room contains a large bed which has been turned on its side. Dusty hay and down litter the corners of the room, which without exterior windows is cast in a deep earthen shadow.
10 Karl’s Room
This room contains a thrashed bed and some broken furniture. The small window has been smashed. A breeze blows into the room, bringing with it the smell of grass and cedar.
11 Anna’s Room
This windowless room has a single bed that has been gutted like the rest. A vanity and wardrobe shows signs of vandalism. Their contents have long since been looted. Someone with the initials “K.U.” has carved crude remarks about a woman named Anna and her questionable heritage into the wood grain of the furniture.
12 Baron’s Suite
The room has a distinctly foul odor to it. In the shadowy light that streams through the windows, a humanoid form with withered and whitened hair slithers from a throne, shakes his fists defiantly and charges up the iron spiral staircase at the far end of the room. A sitting table flanked by two chairs fills the north end of the room under the window, atop it an unlit candelabra. Three chests line the south wall, upon the center one rests a notebook and a silver pitcher.
When the party enters the baron’s suite, he will flee up the spiral staircase.
3rd floor:
1 Baron von Stieglitz’ Bedchambers
In this round chamber high above the valley, bright spotlights from the five circular windows illuminate silver cobwebs draped like tule about the five-poster bed in the center of the chamber. A small table leans against the west curved wall, and a dresser against the east curve. A spiral staicase at the south end of the room leads down into the darkness.
Beneath the cobwebs in the bed is a long-dead servant girl, the object of desire that drove the Baron into madness. (more description here, probably a read-aloud, something to the effect of)
Sinewy strands of flesh bind the woman’s mouth, and a festered and rotten slit is visible under her chin.
The windows offer views of the surrounding valley, making the tower a perfect lookout spot and the castle well-defended.
Creatures: Baron von Stieglitz, wight (CR12) who has likely fled to this location from the room below. In addition, many bats (20-40) live in the rafters beneath the tall ceilings of this tower. They will fight on the baron’s side.
If the party survives the fight, the Baron’s parting words:
I have failed you Katherine! I have failed you father, grandfather, uncle Jakob! I now know in death what you thought of me in life.
Soon after, the Stieglitz ghosts arrive and carry his body down to the mausoleum for burial. Then they sink back into their sarcophagi and disappear from sight.
An alternate ending is that the party parlays with the Baron and works with him to restore his name and honor.
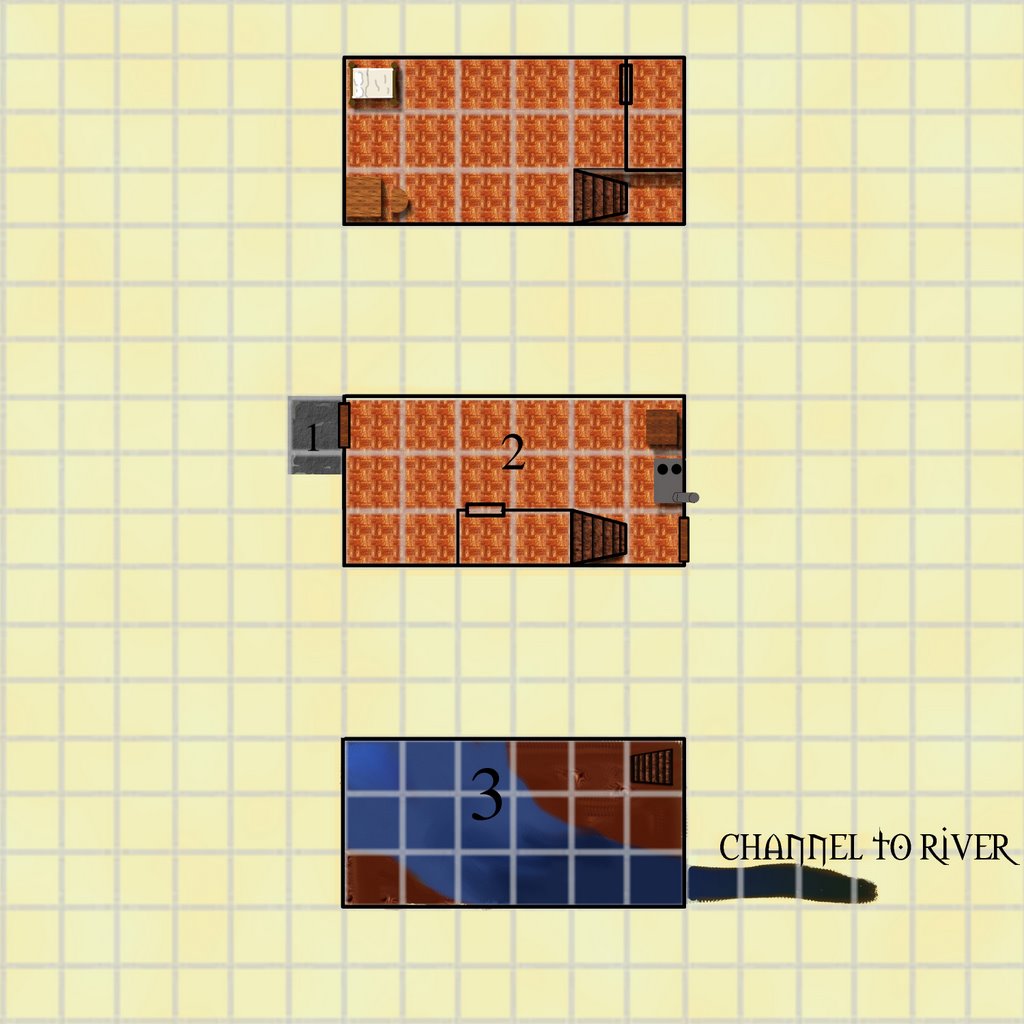
Cellar:
Development: If the party heads down into the trapdoor, and they haven’t met the servants, the servants close the trapdoor and drag the table back atop it, trapping the party in the cellar. Cries for help will eventually bring the remaining servants to investigate. They will not open the trapdoor until they verify the party means them no harm, which may require the party disposing of the undead.
The party must succeed at a DC 25 strength check to lift the trap door open (5 round action) if the servants do not help. They can also cajole the servants to open the trap door. This requires a DC 25 Diplomacy check (10 round action) to change their initial attitude from Unfriendly to Friendly.
1 Food Storage
This 5’ x 10’ room is musty and ridden with cobwebs. Shelves that look as if they once held dry goods now only display rat droppings.
2 Equipment Storage
This is another 5’ x 10’ room that contains mops, brooms, balls of rags, buckets, feather dusters, and other custodial equipment. They have not seen use in quite some time.
A DC 5 Search check will allow to party to find 5 large bars of soap.
3 Wine Cellar (EL 8)
This unlit earthen room is filled with narrow rows of shelves, stocked with bottles of wine. Several dead men in mail lie on the ground amongst broken bottles of wine in the tight spaces between the shelves, weapons still in their rotting hands.
Most of the areas in this cellar are 2 1/2 feet wide, which means that medium sized creatures will have to squeeze to move through these areas. Squeezing characters move at half speed and receive -4 to their attack rolls and AC.
Violent activity while squeezing adjacent to the wine racks has a 50% chance of sending wine bottles crashing to the ground. This fills the space the character is in with glass-caltrops as above.
Creatures: Mohrg, HP: 85 and Zombies (3) HP: 15, 18, 15 AC: 16
Several months ago the kennel master, a cruel and coarse man, was caught by a servant girl getting drunk on the Baron’s wine here. Enraged, he slit her throat and drunkenly violated her. Shortly afterwards the Baron leapt upon him and slew him. The taint of his evil has lingered and now his body stalks the cellar as a Mohrg.
Afterwards, during the looting of the castle by the Baron’s factious underlings, several men-at-arms came to the basement to steal the wine. The mohrg slew them and they now serve him as zombies. The zombies will lie still on the ground until the mohrg begins it’s attack, at which point they will rise up and join the fray.
All of the undead, being dead and suffering no pain, are unaffected by the wine-caltrop effect.
Tactics: The Mohrg will attempt to hide until it can attack one of the party from such a position that they must face it one-on-one. The zombies will rise up to sew confusion once the attack has begun, grappling and slamming. The mohrg will tenaciously attack one foe until it is dead or paralyzed, then move on to the next, until it is slain or has slain everyone. If defeated it expels vile curses with it’s grotesque tongue as it falls, calling it’s defeaters mongrels and dogs in Wyndm.
Treasure: The three zombies are wearing serviceable suits of chain mail and their heavy maces lie on the ground. In addition, there is a large sack of loot they had taken before meeting their fate here. It contains 500 gold worth of accouterments including a candelabrum worth 100 gp, most of a 8 seating set of silverware worth 80gp and various other valuables. Finally, the wine on the racks amounts to 80 bottles of various quality and vintage. Their values range from 2 sp to 10 gp each, and average at 4 gp each. A DC 20 search check along with a DC 15 appraise check will allow characters to discover a 50 year old bottle of fine brandy worth 100 gold.
Development: If anyone moves the obstacles and enters the cellars without speaking with the remaining servants first, they will come and replace the obstacles at the first sound of battle, or before if they happen upon the open hatch. As noted above, opening the hatch with the table and rubble piled on it requires a DC 25 strength check, or convincing of the former servants that the trapped people mean them no harm via diplomacy or bluff.
Ad Hoc XP Adjustment: +10% XP for difficult terrain and zombies.
Posted in Encounter and tagged Horror of the Old Ones, Location by Stephen Hilderbrand with no comments yet.
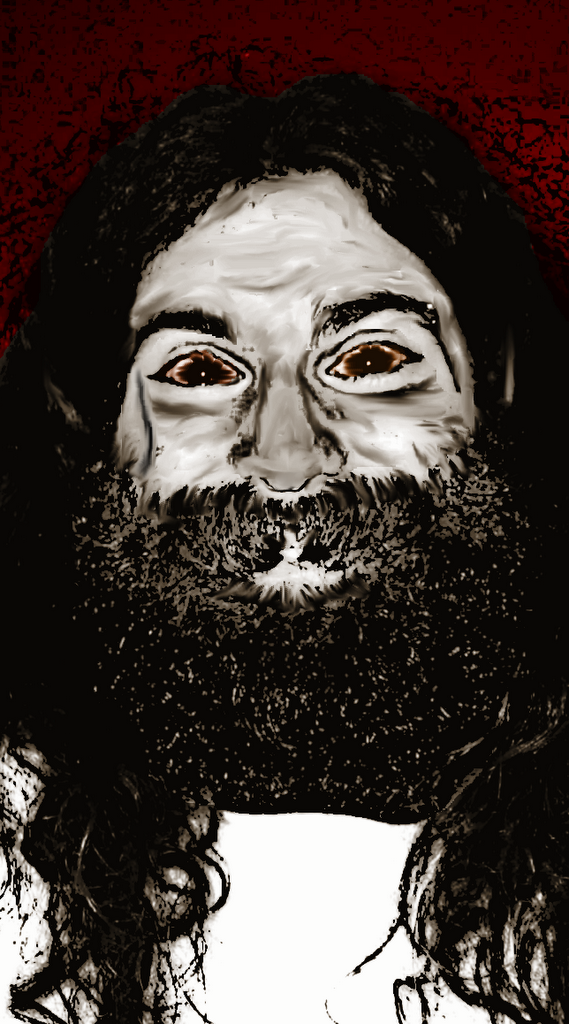
Character: Yevgeny Divoký the Fierce (CR 8)
Yevgeny Divoký the Fierce, an ethnic Wyndm-folk, took charge of one of the four factions created by the Baron von Stieglitz’ power vacuum. His followers mostly include other Wyndm-folk. He intends to round up even more by visiting the refugee camps hidden deep in the marsh. His main motivation is the protection of his people.
Yevgeny Divoký CR 8
Neutral good Male Human (Wyndm) Ranger 8
medium humanoid
Init: +3 Senses: lowlight vision
Listen +10, Spot +9
Languages: common, wyndm, giant
AC: 23
HP: 68 (8d8+16 HD)
Fort: +8 Ref: +9 Will: +4
MV: 30ft.
Attack: +11/ +6 with + 1 longsword, +13/ +8 with +1 longbow
Full Attack: +11/+6/+11 with +1 longbow
Space / Reach: 5ft/5ft
Base Attack: +8/+3 Grapple: +10
Abilities: Str: 15 (+2) Dex: 16 (+3) Con: 14 (+2) Int: 12 (+1) Wis: 14 (+2) Cha: 10
Feats: dodge, mounted combat, mounted archery, weapon focus (longbow), rapid shot*, many shot*
Skills: climb +8, handle animal +6, heal +7, hide +11, jump +6, knowledge (local) +6, knowledge (nature) +7, listen +10, move silently +9, profession(mercenary) +7, ride +8, search +6, spot +9, survival +7, swim +7, use rope +5
Class Features: track, wild empathy +8, animal companion, endurance, combat style* (archery), improved combat style* (archery), woodland stride, swift tracker
Favored enemies: human/ giant
Spells Prepared or Available: 2/1: Summon Nature’s Ally I, entangle, barkskin
Posessions: Leather Armor +4, long sword +1, long bow +1, 50 arrows, sack of dried meat, scroll case filled with various poems written in forest wyndm, 400gp.
*Detailed Special Ability or Attacks (type): Combat style archery grants him the rapid shot feat. Improved combat style archery grants him the many shot feat.
 Minions: Yevgeny is sometimes seen with a Wyndm wolf named Zami, which means “wild one” in forest wyndm.
Zami (CR 4): wyndm wolf
Posted in Character and tagged Journey to Castle Steiglitz by Stephen Hilderbrand with no comments yet.
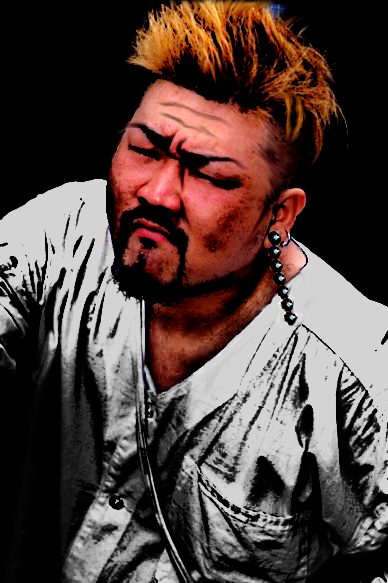
Character: Petry Pokrm the Dish-eater (CR 8)
Petry Pokrm the Dish-eater is a man of unknown origin who fought himself out of the slums of Onuago when he was brought to the town to work as a slave as a young boy. His present-day followers are mostly of thug origin, and seek to disrupt the powers that be. It is said that he is part orc, which comes out in his violent language and actions when he drinks. His men have been seen harassing people in Onuago. His name comes from a time, after outslugging a man in a duel, as tribute he ate not only his opponent’s meal, but the wooden dish it was served on. Then he took his money, and has been a thug ever since.
Fighter 3, Barbarian 5
Petry Pokrm (CR 8)
Chaotic Neutral Male Human/Quarter-Orc Barbarian 5, Fighter 3
medium humanoid
Init: Senses: normal
Listen Spot
Languages: common, orc, some Mountain Wyndm
AC: 16 (+4 armor, +2 dex)
HP: 5d12+20 + 3d10+12 (HD) 120 hp.
Fort: +7 Ref: +2 Will: +2
MV: 40′
Attack: +11 halberd 1d10+4 (x3) plus trip
or +11 falchion 2d4+4 (18-20, x2)
or +? whip disarm or trip
or +10 throwing axe 1d6+3
Full Attack: +11 / +6 halberd 1d10+4 (x3) plus trip
or +11 / +6 falchion 2d4+4 (18-20, x2)
or +3 / -2 whip disarm or trip and +2 throwing axe 1d6+3 (adjust for 2 weapon fighting)
or +11 / +6 throwing axe 1d6+3
Attack Options: Rage
Space / Reach: 5′ / 5′, 10′ (halberd), 15′ (whip)
Base Attack: +8 Grapple: +11
Abilities: Str: 17 Dex: 14 Con: 18 Int: 12 Wis: 11 Cha: 13
SQ: Fast Movement, Uncanny Dodge, Trap Sense +1, Improved Uncanny Dodge
SA: Rage 2/day
Feats: quick-draw, dodge, mobility, spring attack, power attack
Skills: +7 climb, +12 intimidate, +7 jump, +5 listen, +8 survival, +14 swim
Posessions: chain shirt, halberd, falchion, whip, 2 throwing axes.
Rage (ex): +4 str, +4 con (+16 HP), +2 will, -2 AC for up to 25 rounds.
Tactics: A wild fighter, Petry will run circles around his foes, charging in and out in a rage, droping one weapon to draw another and leaving the field of battle littered with his weapons and the limbs of his foes.
Posted in Character and tagged Horror of the Old Ones, Journey to Castle Steiglitz by Stephen Hilderbrand with no comments yet.
Location: Castle Stieglitz – Ground Floor
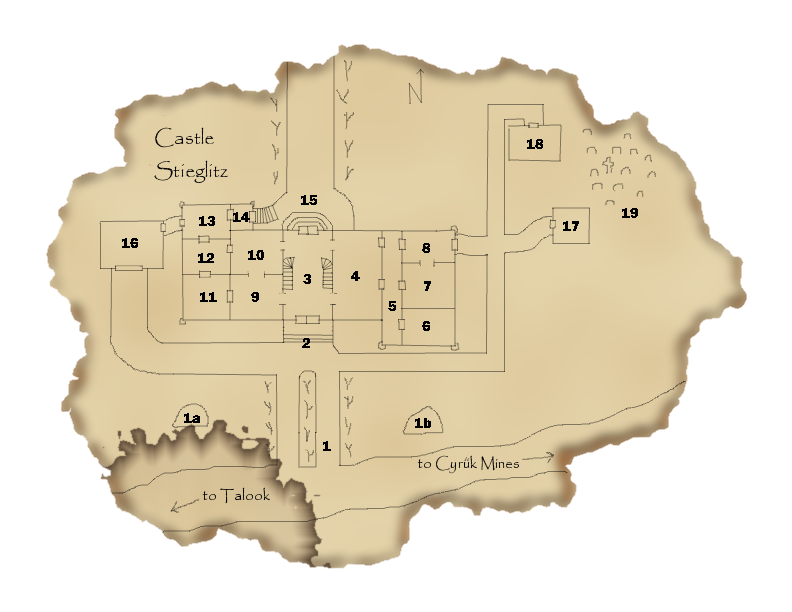 1 Driveway
a,b Brush Piles
2 Entry
3 Foyer
4 Dining Hall
5 Hallway
6 Storage
7 Kitchen
8 Pantry
9 Training Hall
10 Training Hall
11 Meeting Room
12 Trophy Room
13 Sitting Room
14 Mud Room
15 Back Patio
16 Stables
17 Shed
18 Mausoleum
19 Graveyard
Overview
Presented here is the first floor of the interior of Castle Stieglitz. Here characters will meet the Baron in the castle and learn his history, and what must be done to save him and restore glory to the castle which requires having him right his wrongs with the help of his disbanded men.
The castle has been looted by fleeing servents & factions, but the wine steward remains (who is aware of something creepy in the cellar!), as are two remaining servants, who spend their days foraging for food in and around the kitchen, and their evenings huddled for safety in the stables.
The mausoleum is full of ghosts who wander the graveyard wailing to the baron and who flee if attacked.
There are two routes for resolution:
1) diplomacy checks to convince the baron to hold the festival (atonement) and diplomacy checks or tasks to put the army back together
2) defeat the baron and the undead at the castle. Put Anna in as the new baroness (with the help of a local preist to make it official) and put down the other armies.
Additional Background: Several months ago the Baron Stieglitz witnessed the violent assault and murder of one of his servants by the drunken kennel master. Instead of stopping the crime he hid in the shadows and watched the whole scenario. When the vile kennel master tried to skulk away undetected the Baron stabbed him in the back. He then took the body of the servant girl to his room and locked himself in. Overcome with the guilt of experiencing pleasure at witnessing such a horrific event, he contemplated the monster he truly was. He shed tears over the girls bruised face and lay down beside her to join her in the afterlife. After several days with out food and water his vitality diminished and he closed his eyes for the sleep of eternity. But the Baron did not die. His body stirred again. His corrupted spirit lived beyond death and refused to give up it’s mortal host. The Baron Stieglitz had become a wight.
1 Driveway
This brick-inlaid driveway framed by diseased trees leads from the road to Castle von Stieglitz. The path is slightly overgrown with weeds, and large piles of brush decorate both halves of the front lawn. The castle rises in the distance, a wide stone structure with a central tower made from the grey granite of the surrounding mountains.
Creatures: Thousands of ravens inhabit the grounds, mostly living in the trees. They will follow the party as they make their way about the grounds.
1a,b Brush Piles
Piles of brush have been left here to rot, including entire branches of the shorn trees. Ravens circle in the sky above the piles.
Creatures: Dire Rats(6), detected with a listen check DC 15. In addition, brush mites may infest the characters’ equipment, making them itchy and generally uncomfortable during their stay in the castle.
Tactics: Unless detected earlier, the dire rats spring from the piles as the last character walks past attacking en masse!
2 Entry
The enormous Castle von Stieglitz offers an impressive counterpoint to the distant mountains surrounding this broad valley. Atop a slightly inclining hill, its stonework glows in the afternoon sun. Normally a festive occasion, the castle grounds are abnormally quiet for this St. Zyekni’s Day. The trees within the complex are early in their barrenness, despite the planned celebration of autumn harvest season. There is no welcoming party, save a flock of ravens perched by the hundreds in the defoiled arbors. Other ravens pirouette about the main steps, rending pieces of cloth from one another’s beaks.
Two heavy wooden doors adorned with the Stieglitz coat of arms – a ship above three coins in a chevron – are framed by an arch.
If the characters approach the ravens, they fly off, landing on the multi-stepped rooftops of the giant stone structure, calling out to their brethren. If the characters examine the cloth, they notice that it was once a tunic, but there is no sign of the disrobed. Once the characters approach the doors with the intent of opening them, a breeze picks up and the doors creak open slightly.
Creatures: Swarm of Ravens (hundreds), though they will not attack unless attacked themselves or the characters enter the castle.
Tactics: If attacked, the ravens swarm fiercely in groups of 30 or 40 per party member. When they enter the castle, the ravens swarm at them. Luckily they cannot open the castle doors. Unluckily, the wind may, if they are not properly fastened or barricaded.
3 Foyer
This open hall . The doors at the far end open and close in the breeze. Staircases rise on either hand before meeting in a landing on the south end of the hall. Orange light streams through a stained-glass window, illuminating the intricate marble floor now marred with scuffmarks from many heavy things being dragged across its surface. Archways open two to the east and two to the west.
4 Dining Hall
Light filters in through the dusty curtains covering the floor to ceiling windows in this once lavish dining room. Dust several layers thick covers the long wooden table that dominates this room. The tablecloth has been been partially removed and spills off one side of the table onto the floor. A couple of wilted floral arrangements that were once centerpieces have been knocked over and lie in disarray. There are cobwebs decorating the chandaliers, and chairs are conspicuously absent from the room. Clean patches of the floor and walls remain where once there were tapestries and rugs.
The door near the back wall is locked. If the PC’s manage to unlock it, they will discover that the door across the hall to the pantry is locked and also has a large pile of broken furniture covering the doorway.
Creatures: Rats (30).
Tactics: The rats scurry away from the party.
5 Hallway
This narrow hallway is dark, dusty, and filled with cobwebs. There are 2 doors along one wall, one open one not. Through the open door you can see the dining room. There are 3 doors running down the other side of the hallway, 2 are open, the third has a pile of broken furniture stacked up against it.
Treasure: Among the broken furniture, the party finds a few religious relics from local shrines and chapels.
6 Storage
The smell of spoiled food lingers in the air in this dark storage room. Vermin scurry into hiding in the darkness. This room contains pieces of broken furniture and filthy clothes lie in disarray on the floor.
7 Kitchen
The smell of a recently cooked meal permeates the air. The hearth gives off a welcome warmth. A dusting of flour on the floor reveals foot prints. There are some dirty pots on the washstand along the southern wall.
Creatures: The party may encounter one of the 3 remaining servants cooking a meal at the hearth. The servant flees when the party arrives. A DC 10 survival check reveals 3 different persons footprints in the flour.
8 Pantry
A table lies on its back in the center of the room, a stack of gravestones on top of it. A corner of a wooden trapdoor is visible along its edge.
Development: If the party heads down into the trapdoor, and they haven’t met the servants, the servants close the trapdoor and drag the table back atop it, trapping the party in the cellar. A DC 25 strength check is required to open the trapdoor. Cries for help will eventually bring the remaining servants to investigate. They will not open the trapdoor until they verify the party means them no harm, which may require the party disposing of the undead.
a. Cellar
b. Wine Cellar
9 Training Hall (there’s a door from here to 11 that’s not here yet)
Straw training dummies lie strewn about the room, the victims of some spontaneous pinata party. A large straw mat — nearly the size of the room — covers the center of the parquet floor. The room is otherwise completely spartan.
10 Training Hall
This room is completely empty, save random strands of straw that lead off in every direction along the parquet floor.
11 Meeting Room
A large table adorns the far corner of this room, over which is hung a map of the surrounding countryside. Pins mark regions close to the castle, including Onuago, the Swft River Crossing Inn and Talook. One region of the map — close to the eastern edge of the Old Bay — has been torn off.
The area that has been removed from the map is Harpy Point. Characters who make a Local Geography check DC15 will recognize this.
Treasure: The map may be worth something, especially since there are clues leading to a pirate treasure on the back side. Unfortunately, the missing area of the map contains one half of the riddles.
12 Trophy Room
The fireplace at the back end of this room signifies a space that once displayed hunting trophies. Wooden stands lie empty, pilfered of the furs and taxidermied animal corpses.
If the characters search the fireplace, they find the remains of burnt books with barely legible writing scribbled in the interior margins. One book appears to be a history of the once proud Stieglitz family, but there is not enough remaining text to tell any complete story. If the characters present these remains to the Stieglitz ghosts, they will tell more of their stories.
13 Sitting Room
This room is full of thrashed furniture with major pieces missing.
A few copper pieces are all that remain inside one of the cushions. All other treasures have been removed from the castle.
14 Mud Room
This tiny room serves as the space between the back west wing of the castle and the north side of the castle. A wooden door frame in search of a door provides a view of the back patio.
15 Back Patio
Rows of what were once poplars extend from the the back patio, extending along the border to the back of the estate. A plane of fitted stones once made for a cozy patio space, but they are now overgrown with lichen and moss has collected in the spaces in between. A brick-inlayed path leads north between the trees, making for a once formal garden. Gnarly bushes lines the walk, overgrown and under-foliated. The baying of wolves can be heard off in acres of forest behind the estate.
Creatures: If the characters wander too far into the woods, a pack of dire wolves are likely to descend upon them. Dire Wolves (8-10).
16 Stables
These stables no longer house horses or carts, both of which are long gone. The stables are relatively spartan, save a pair of hay bales set up as twin makeshift beds, covered with blankets and leather sacks.
Treasure: The sacks are filled with gold flakes and scraps of tapestries, linens and a few pieces of tarnished silverware.
17 Shed
A rickety old shed adorns the east end of the estate, its splintered wood a reminder of the eternal entropy at home in this place.
If the characters enter, they note various tools and a bale of hay in the center of the room. Rain water has made the hay soggy.
Creatures: A few rats have made their home in a bale of hay in the center of the shed. They scatter once the party opens the door to the shed.
18 Mausoleum
If the characters enter the mausoleum with a light source, read or paraphrase the following.
Behind the castle is an outbuilding that serves as a monument to the von Steiglitz family. Multiple generations are buried in the sacred chambers in the mausoleum and on sacred ground in the graveyard. Five sarcophagi line the outer walls of the mausoleum, one along the far wall, and two along each of the two side walls. The walls ooze with a murky jelly.
Unfortunately, the denizens of the graveyard are restless, and seek to haunt the Baron until he embraces the family law. These characters from the past will rise up to protect the Baron if the party attacks him. They should heed the warnings of the many generations of paintings on the walls of the castle.
19 Graveyard
An impressive stone edifice occupies a large part of the backyard. Rows of gravestones populate the grounds behind the mausoleum in three neat rows, framed by cherry trees. The carvings on the door of the stone mausoleum indicate a minor fortune spent to honor the dead. The door itself has been left slightly ajar.
The door is ajar because it’s been used by the Baron’s undead ancestors as they wander the castle grounds at night. They have been haunted by their faded family name, and have withered into wights like their corrupt descendant. If the party attacks the Baron, they will rise from their graves, along with the dead from the other graves and shamble to his defense.
Creatures: Wights (5). By night the wights from the mausoleum wander these grounds moaning remonstrations up at the barons window. “St. Zyekni! St. Zyekni!” they groan as clearly as their rotted tongues will allow.
Tactics: The wights are unfriendly to anyone entering and hiss from the shadows and from behind decayed trees, but will not attack unless themselves attacked. The undead family members will not be satisfied until the Baron returns the Castle von Steiglitz to honor. The celebration of St. Zyekni’s Day has never before been missed on the castle grounds.
Posted in Encounter and tagged Horror of the Old Ones, Location by Adam A. Thompson with no comments yet.
Encounter: The Scholar Falkonne’s House (EL 7)
1) Outside The Scholar’s Home
113 Torrance Street. The house sags to the right as you stand before the mildewy wooden door, which hangs slightly ajar. Through the space between the row houses on either side, you can see the muddy banks of the Lazy River, its waters sliding past the foundation stones.
General description – A DC 5 Wilderness Lore check allows the players to see the boot prints of a humanoid walking towards and away from the house. They are also found around the front yard leading up to the door. All the bootprints are from the same person: the old scholar. The most recent ones are about two days old.
2) The Scholar’s Rooms
Upon entering the house, the players will smell the briny water of the Lazy River intermingled with a fouler stench coming from the basement—a combination of rotten eggs and decaying vegetables.
The first floor of the house is cluttered with stacks of papers, books, and various measuring instruments.
The kitchen is located in the back and a door leads out to what would have been a backyard in days past. Now it opens up to the muddy banks of the Lazy River. The kitchen sink still has dirty dishes in it. The coals from the stove are cold. There is a trap door to one side of the kitchen. It is open and stairs lead down into darkness. The smell of rotten vegetables and salt water is stronger here.
A DC 10 Search check will allow the players to find an old, but still serviceable spyglass in the closet/spare bedroom on the first floor. Most of the papers are written in the same handwriting (the scholar’s). Others are taken from various sources. The papers and books pertain to the history of this region, the Wyndm people and their culture (particularly their religious beliefs), and geographical surveys of the area.
The best source of information will be on the second floor loft, where the scholar’s opus magnum sits upon an unvarnished wooden desk with uneven legs. The book is entitled “On the Origin of the Children of the Sea” and is unfinished. The last sentence of the last page stops in mid-sentence (this is when the scholar went downstairs to investigate the noise from the basement). Cold coffee and half-eaten bread (covered with small cockroaches) are next to the book on the desk. The desk also has an inkpot, some pens. In one of the drawers, the party can find 10 silver and 35 copper pieces.
A bed with a sagging, stained mattress is directly opposite the desk. A wardrobe is next to the bed and contains a few articles of threadbare clothing.
Whenever the party spends a few minutes perusing the book, they discover the following things about the situation in Onuago and Elsemere:
3) Flooded Basement (EL 7)
This basement is severely flooded, half of it’s floor eroded and filled with dark water. At the base of the steep steps leading down an unlit lantern lies on it’s side, it’s glass broken.
Creatures: A Chuul (CR 7) has taken up residence in the washed-out and flooded basement, into which it dug a canal several days ago. Yesterday it had become hungry and restless. When the scholar entered the basement to investigate the sounds he quickly became it’s latest meal. It is now well-satiated, having eaten aproximately half of Falkonne’s body, and is content to lay concealed in the water in the basement unless it’s realm is entered or it’s kill is distrubed.
Chuul: HP 98 (Monster Manual)
Tactics: If the chull hears the party entering the house it will conceal itself in the water in the basement (Hide +13, +6 circumstance for water and +2 for darkness = +21). If anyone comes downstairs it will attempt to grab them with suprise and drag them into the deeper water with it to drown, parylized by it’s tentacles. Persistant attacks will cause it to resurface to grab the last attacker and submerge them.
Treasure: A thorough search of the basement (DC 20) reveals a small lock-box mostly buried in the mud. It contains the Falkonne family’s savings: 20 gold coins, 315 silver coins, and a rodochosterite worth 10 gold.
Development: The dead scholar is restful in the afterlife and will not return if raise dead or similar magic is cast on him.
If enterprising characters cast speak with dead on the body it reveals the information listed in the scholar’s journal.
Asking around (DC 10 gather information) revelas that the scholar has no next of kin, being befeft of his wife and recently his only child, who was apparently a disfigured shut-in.
Ad Hoc XP Adjustment: +10 % XP due to ambush situation.
Posted in Encounter and tagged Horror of the Old Ones, Location by Adam A. Thompson with no comments yet.
Creature: Mud Naga (CR 6)
Mud Naga
Size/Type: Large Aberration (Marsh/Mudflat)
Hit Dice: 6d8+24 (50 hp)
Initiative: +1
Speed: 30 ft. (6 squares), mudstride 50 ft.
Armor Class: 15 (-1 size, +1 Dex, +5 natural), touch 10, flat-footed 14
Base Attack/Grapple: +5/+12
Attack: Bite +7 melee (2d6+4 plus poison)
Full Attack: Bite +7 melee (2d6+4 plus poison)
Space/Reach: 10 ft./5 ft.
Special Attacks: Poison, spells
Special Qualities: Darkvision 60 ft.
Saves: Fort +6, Ref +5, Will +8
Abilities: Str 16, Dex 13, Con 18, Int 10, Wis 17, Cha 15
Skills: Concentration +12, Listen +7, Spellcraft +8, Spot +7, Swim +11
Feats: Alertness, Combat Casting, Eschew Materials, Lightning Reflexes
Environment: Temperate marsh or mudflat
Organization: Solitary, pair, or nest (3-4)
Challenge Rating: 6
Treasure: Standard
Alignment: Usually neutral
Advancement: 7-9 HD (Large); 10-15 HD (Huge)
Level Adjustment: —
Mud nagas speak Muddle and Common.
Combat
Mud nagas prefer to stay mostly concealed in a pool of mud while they launch a spell attack.
Poison (Ex)
Injury, Fortitude DC 15, initial and secondary damage 1d6 Con. The save DC is Constitution-based.
Spells
Mud nagas cast spells as 6th-level sorcerers but never use fire spells.
Typical Sorcerer Spells Known (5/6/6/3; save DC 11 + spell level)
0—acid splash, daze, detect magic, light, mage hand, open/close, read magic; 1st—expeditious retreat, magic missile, obscuring mist, shield, true strike; 2nd—invisibility, acid arrow, mirror image; 3rd—protection from energy, suggestion.
Skills
A mud naga has a +8 racial bonus on any Mudstride check to perform some special action or avoid a hazard. It can always choose to take 10 on a Mudstride check, even if distracted or endangered. It can use the run action while mudstriding, provided it slithers in a straight line.
Posted in Creature and tagged Horror of the Old Ones by Stephen Hilderbrand with no comments yet.
Language: Muddle
Muddle is spoken by certain mud-based creatures. It consists mostly of tonal hisses and nearly inaudible clicks that pass through the mud to the intended recipients. There is no such thing as plurals in muddle, so all conversation is one-on-one. This requires messages to pass from one creature to the next. Many would consider this a disadvantage of the language, but others see the hierarchical nature of message propagation to be a societal advantage.
Posted in Uncategorized and tagged language by Stephen Hilderbrand with no comments yet.